Up until recently, I have hosted my site on Netlify. They offer free hosting with great Github integration and a smooth developer experience. All this is supported by plenty of other great services. I was super happy with them. But then Cloudflare announced their new service Pages. So far, Cloudflare was known for its fast CDN and networking services. Given their reputation, I have decided to give it a shot. I was wondering if changing my hosting could have some noticeable impact on my page load times.
And oh boy, it did.
In this article, I will briefly guide you through the entire process of moving my site from Netlify to Cloudflare Pages with all the little bumps I had along the road. Then I will show you how it impacted the performance of the site.
Migration steps
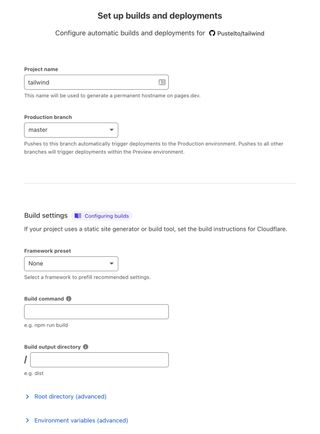
Permalink to “Migration steps”At first look, Cloudflare Pages is pretty similar to Netlify or Vercel. You connect your repo, set your build command, hit save and that’s it. You have automatic deployments with preview links for your PRs. Cloudflare has great documentation, including specific guides for different frameworks and static site generators.
Ok. Now I have my site on Cloudflare.
Well, not really…
I have moved my hosting. Unfortunately, I’m using more tools from the Netlify ecosystem (build plugins, inject code snippets, etc.). So the migration of my setup 1 to 1 is not that straightforward.
Here is the list of the stuff I need to solve to move entirely to Cloudflare Pages:
- Migrate Netlify build plugins
- Include code snippets (analytics) only during production build
- Transfer my domain to Cloudflare
- How to set up custom HTTP headers for my page
- URL redirects
Build plugins
Permalink to “Build plugins”I use Netlify’s build plugin to extract Critical CSS for my blog. So I need to get this on Cloudflare as well. HTML won’t start rendering until it has downloaded CSS, but if you inline your critical CSS into your HTML and lazy-load the rest. HTML can start to render right away after the first network request. This may improve your page load time quite a lot.
I picked probably the easiest possible way. Since the Netlify plugins are open source, I simply found the source code of the Critical CSS plugin on Github and extract the code into the Node.js script. I run this script during the build process. I have migrated the build plugins, and it took only a couple of minutes of work. Open source FTW 🎉.
To the next step, which is…
Include code snippets during build time
Permalink to “Include code snippets during build time”I use Plausible as my analytics. It’s paid, but privacy-focused analytics tool which gives me all the information I really need. It’s super lightweight, and I’m more than happy to support independent developers and their great products 🙂.
On Netlify, I used the build setting to include the Plausible code snippet during build time. It was an easy way, how to avoid firing analytics events during development. Since Cloudflare doesn’t have this option, I had to use some other method. Luckily there is Eleventy high performance blog template which utilize Eleventy data cascade in a clever way to add isDevelopment flag into templates. Another quick copy-paste action and another finished item from my to-do list.
Domain transition
Permalink to “Domain transition”The next step was to move the domain to Cloudflare. I had to change my nameservers to point to Cloudflare. I buy my domains via Vercel (I use it for few projects and love how easy and smooth is the process of buying domain there). But since Vercel isn’t a domain registrar, I had to contact Vercel’s support in order to change the nameservers. Based on their info, Vercel support process requests for free accounts within 3-5 days. But I had got my nameservers changed the next day 👍.
Once Cloudflare noticed correct nameservers, I could add a custom domain to my webpage, assign the worker to modify the headers, and handle the URL rewrites.
Adding custom HTTP headers to Cloudflare Pages
Permalink to “Adding custom HTTP headers to Cloudflare Pages”If you want to set custom headers for your web page hosted on Cloudflare Pages, you simply have to add _headers file to the root of the build folder (pretty easy in Eleventy, just add config.addPassthroughCopy("src/_headers"); into your eleventy.js file).
Syntax of the _headers file is simple as well. You just need to specify the URL pattern and then custom headers below it.
/*.avif
  Content-Type: image/avif
  Content-Disposition: inline

https://:project.pages.dev/*
X-Robots-Tag: noindexCheck out the official documentation for headers or my own _headers file.
This should probably satisfy most of your needs when customizing headers. But if you need something more advanced, then you have to use Cloudflare Workers. Continue reading, if you are interested in that, otherwise feel free to skip to the next section.
Headers customization using Cloudflare Workers
Permalink to “Headers customization using Cloudflare Workers”Custom headers for Cloudflare Pages were probably the most complicated part of the entire migration. Compared to Netlify, Cloudflare doesn’t have any direct tool to customize your headers. If you need this functionality, you have to use another service – Cloudflare Workers. You have to create a custom worker script to modify the headers. Luckily basic version of workers is free, and Workers documentation even include example showing how to modify the headers. Just exactly what we need.
You can either copy-paste the code and modify it in the web interface. Or you can download Cloudflare CLI, create the script locally and publish it when ready. Below is the example of my worker script:
addEventListener('fetch', event => {
  event.respondWith(handleRequest(event.request))
})

async function handleRequest(request) {
  const reqUrl = new URL(request.url)

  let response = await fetch(request)
  // Make the headers mutable by re-constructing the Response.
  response = new Response(response.body, response)

  if (reqUrl.pathname.endsWith('.avif')) {
    response.headers.set('Content-Type', 'image/avif')
    response.headers.set('Content-Disposition', 'inline')
  }

  response.headers.set('Permissions-Policy', 'interest-cohort=()')
  response.headers.set('X-Frame-Options', 'sameorigin')
  response.headers.set('strict-transport-security', 'max-age=31536000')
  response.headers.set('Referrer-Policy', 'strict-origin-when-cross-origin')

  return response
}
Another downside is that you can’t connect workers to the default URL provided by Cloudflare for your pages. You have to set up a custom domain for your page and add the worker script to the domain by specifying its route. If you need to change headers on your webpage, but you don’t have a custom domain for some reason, you are at a dead end.
This sure isn’t as easy as using Netlify’s config file, but it is still relatively simple to set up. Still, it may be one thing to consider when deciding whether to choose Cloudflare as your hosting.
Custom redirects
Permalink to “Custom redirects”On Netlify, I had custom redirects to route all my traffic from the www subdomain to the root domain. And then from my original domain *.pustelto.cz to https://pustelto.com. The first redirect is handled on Netlify automatically when setting up DNS records. The second one can be done fairly easily as well.
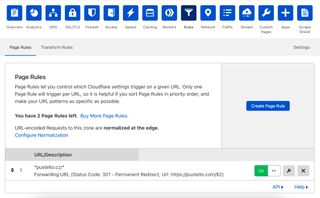
On Cloudflare, I didn’t have much trouble with this. I have moved my second domain to Cloudflare too, and then used rules config to handle the redirects. You can set up the redirects in few clicks. In a free Cloudflare plan, you have 3 Page rules for free. That is more than enough to handle my use case. But if you have more advanced redirect logic, it may not be enough (you can buy additional rules if necessary).

Performance comparison
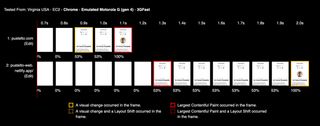
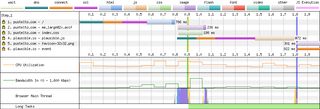
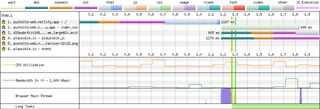
Permalink to “Performance comparison”I compared the page load times of my website on Cloudflare and Netlify using WebPageTest.org. The test setup was mobile emulation of Mogo G (gen 4) on a fast 3G connection. FCP and LCP on Cloudflare were almost 400ms faster! And the page was visually complete in 1.1s compared to 2s on Netlify. That is a really huge improvement I’ve got basically for free. Just by changing hosting, I have got over 300ms better page load across the pages. Another benefit is a slightly smaller payload from Cloudflare, thanks to the support of Brotli compression.
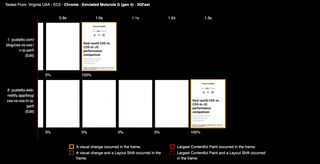
Check out the pictures below for more details. Notice the waterfall chart for Netlify where the image is downloaded from another domain and so it requires another SSL connection which will add to the total time necessary to download the file.
So should I migrate to Cloudflare?
Permalink to “So should I migrate to Cloudflare?”It depends 😅.
You should consider what you have to migrate and what would be the cost of it. If you are already heavily invested in another hosting platform (be it Netlify, Vercel, or something else), it might add extra effort to convert your entire setup. Netlify, for example, offers a bunch of other great tools, and leaving the entire ecosystem may be problematic. But the performance gains can outweigh the cons of the migration. As always, when working on performance-related stuff, measure it.
Another thing to consider is the price. As mentioned above, you can get the basic stuff for free on Cloudflare as well. But for more complex sites, this may add an additional cost. Especially with workers and page routes, you can go from free Netlify to paid Cloudflare quickly in more advanced cases.
But for simple static sites, I think it is worth it.
Conclusion
Permalink to “Conclusion”I hope this article will help you in case you decide to give Cloudflare Pages a chance. And eventually help you with migration, since there were few little things I had to figure out myself (eg. custom headers and redirects) since documentation didn’t mention this. But overall switching to Cloudflare wasn’t too difficult and I manage to finish it in few hours of work.
That’s it, folks. Let me know on Twitter if you tested the Cloudflare Pages and what do you think? Or if you decided to stick with a different platform, let me know which one and why. I would love to see what are you using.
Updates
Permalink to “Updates”6 November 2021 - add info about new way how to set custom headers for Cloudflare Pages.
